
View your Step-by-Step Guide to exporting a patient list from Proda and completing an upload in Cubiko! Watch a short tutorial of steps 2-5 HERE!
- Step 1 - Exporting MyMedicare Registered Patient Lists from Proda
- Step 2 - Upload file
- Select a file to import that is in a CSV format.
- Step 3 - CSV Validation before processing
- We will validate the CSV file before processing to ensure there are no errors.
- Step 4 - Confirm upload
- The CSV upload may be successul but return with errors for certain rows which will be listed. If you confirm the submission, those rows will be omitted.
- Step 5 - Write updates to Best Practice (Optional)
- If you have updated to Best Practice Premier Orchid Sp1 Revision 1, you can update your registered patient records from the CSV upload of MyMedicare registered patients in Cubiko.
NOTE! The MyMedicare CSV import can be uploaded in Cubiko within
Cubiko settings > MyMedicare:

Top Tip! For optimal MyMedicare patient registration tracking, Cubiko suggests performing this export and import process weekly to ensure the most current data is at your fingertips. The more frequently you do this, the more up-to-date your metrics will be.
Some of the key MyMedicare metrics this import will apply to are:
- MyMedicare patients and cohort analysis:
- Total number of current MyMedicare registered patients and list of eligible patients to register
- Total number of patients withdrawn
- Percentage of MyMedicare patients registered with previous Chronic disease management billings; Residential aged care facility billings; and Telehealth billings.
- List of eligible patients to register with previous Chronic disease management billings; Residential aged care facility billings; and Telehealth billings.
- Today's Clinic Metrics: List of patients booked in today, not registered
- Appointment Opt: Upcoming Telehealth Appointments with unregistered patients
Step 1 - Export My Medicare Registered Patient Lists from Proda
1. Accessing the patient list
To Access the patient list you will need to log in to the Provider Digital Access (PRODA) and have been set up with access to the My Medicare program.
- If you do not have a Proda account, you will need to register for an account here- Register now: Provider digital access.
- If you are unable to access the MyMedicare Program
- Check the Organisation Site is active and has added MyMedicare under the Program Registration tab in the Organisation Register
- Check the user has been assigned the following attributes for the organisation in PRODA. HPOS-Access and HPOS-MyMedicare-Program-Staff
*For more information please visit the Services Australia website- MyMedicare.
Once you are logged into your PRODA account you can access the patient list by selecting "My Programs" and then selecting "MyMedicare". The patient list will display from within the MyMedicare program.

2. Export the Patient List
Use the patient list "search criteria" to perform a search that will then bring up the "Complete Registrations". You can just press search or choose a date range which will bring up your entire list for export.
Note: Ensure to tick the "include in search results" for Withdrawn registrations to update patients that may have changed registered practices without your knowledge.

and then select "Export Complete Registration list".
This will export the Patient List into an Excel spreadsheet (CSV file) which will download to your computer. Save this and download your allocated file, ready for the import step.

*Note the personal details in these screenshots are mock data and taken from the Services Australia website.
Important!
If you have a very large number of patients listed in your exported CSV, it may not upload as the process will time out. You will receive a failure message.
Click HERE to be taken to the workaround options.
TOP TIP: Ensure your MyMedicare Site ID has been entered and saved in BP before completing the next step. You can update your Bp Location details (Setup > Practice Details - then Select the location to edit) with the MyMedicare Site ID. 
Further information on where to find your MyMedicare Site ID: FAQ MyMedicare registered patients - Writeback to Bp
Step 2- Upload a file
This step is completed in the Settings area of Cubiko.
To import the Patient list for MyMedicare go to Cubiko Settings > MyMedicare tab.
Import the Patient List for MyMedicare into Cubiko to access streamlined Registration Tracking metrics

Upload file
Here you can select the "Upload file" button. This will open up the files on your computer, select the exported file that you saved from PRODA.

Once you have selected the file - Hit Upload file!
You will not need to make any edits to the file for it to process correctly, unless you see errors in the following validation steps.
Step 3 - CSV Validation before processing
We will validate the CSV file before processing to ensure there are no errors.
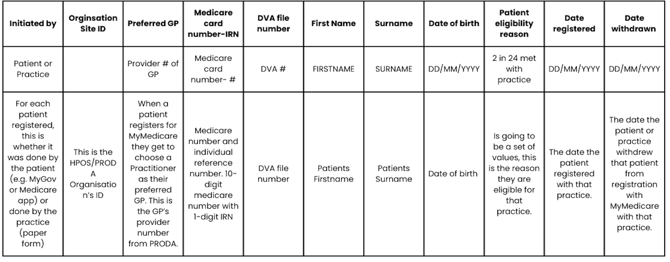
The following columns are being validated:
If the validation was all successful you will see the below. Clicking confirm will apply your upload successfully.

TOP TIP! Post successful upload the data will take an overnight extraction to display in your MyMedicare dashboard.
If there is an error with the CSV uploader you will get the below error- this could happen if perhaps a whole column was deleted and can not be verified. Should this occur you will need to re-export and ensure no changes are made to the CSV file prior to upload:

Step 4 - Confirm Upload
The CSV upload may be successful but return with errors for certain rows which will be listed below. If you confirm the submission, those rows with be omitted.

TOP TIP! You may find some errors for patients here where the Medicare card number does not match, however, the card you have on file in your practice management software may be correct. This can occur for patients who have recently had new Medicare cards issued. There are 2 reasons this may cause an issue:
- The previous number alongside the new number are both active for 1 month before the old number is removed. This can cause some errors where it is unable to match.
- The patient registered with MyMedicare several months ago. The MyMedicare details on the CSV will reflect the details at the time of registration, which may not be the same as the current details with Medicare, or on the patient's Bp file.
You can update the CSV file with the new details if you wish to update the details for this patient, resave it in the correct format, and reimport the CSV file. Alternatively, you can manually update the patient's file in Bp directly.
Step 5 - Write updates to Best Practice
Would you like to update the patient within Best Practice to match the uploaded MyMedicare CSV? Select the "Update Best Practice" button below!
NOTE! This function is only available on the latest version of Best Practice.
If you have the most up-to-date version you will see the blue button:

If you are on an older version you will see this message:

If you would like to perform this write back please select "Update Best Practice". Otherwise you can select Don't update.

The table will show which patients in Best Practice can be updated to match the uploaded CSV.
Upon successful update, you will see a list of "Patient updated"

If no patients require an update as this has already been marked in Best Practice you will see the following message "No patient updates needed".

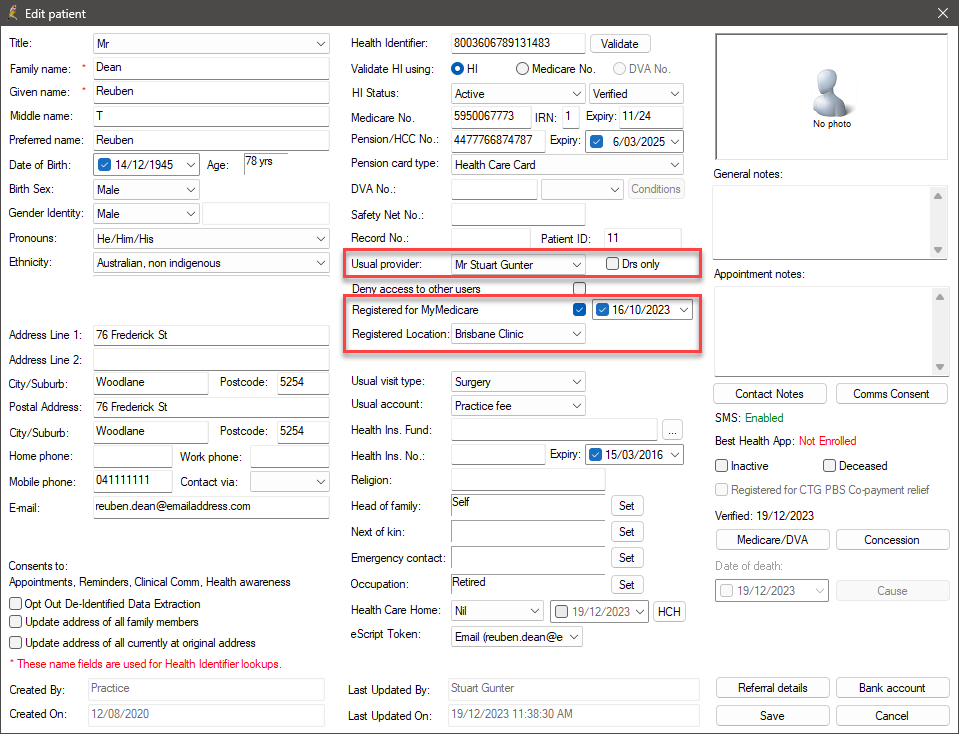
The update in Best Practice will appear in the patient's demographic details in the "Registered for MyMedicare" tick box.
How to resolve timeouts due to large CSV file
*Extracting and Uploading Patient Registration Data*
You'll need to perform two separate data extractions from Proda:
1. For New Registrations:
- Extract a CSV of patient registrations by filtering on the "Registration Created Date"
- Only include the period since your last data upload
- Upload this data to update your records
2. For Registration Withdrawals:
- Extract a separate CSV by filtering on the "Registration Withdrawal Date"
- Only include the period since your last data upload
- Upload this data to update your records
**Important Note:** The second extraction is crucial because it captures patients who may have registered long ago but only recently withdrawn. Using just the first extraction would miss these withdrawals.
Tips for Managing Large Data Sets:
- If dealing with a large date range, break it into smaller periods
- Process one period at a time
- Alternatively, simply filter from the date of your last upload to capture all new changes